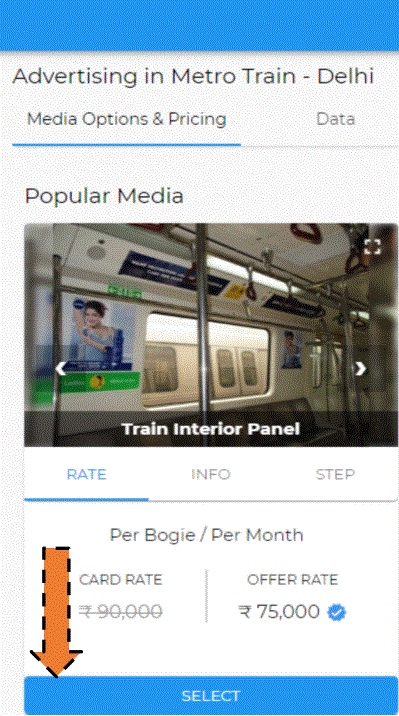
Step 1 – Open the Media Page and click Select. The Media option gets added to the Bag.
Step 2 – Click on the Bag.
Step 3 – Select the target filters as per your requirement and then Save to Dashboard.
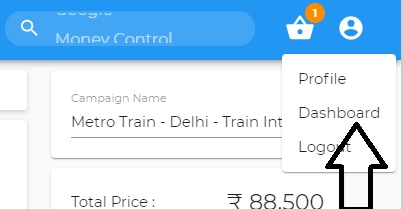
Step 4 – Go to your Dashboard by clicking on the Profile Icon
Step 5 – You will see your campaign there. Click on the 3 dots on the right-hand side
Step 6 – Click Download/Email
Step 1 – Download an excel file of the media options using the steps mentioned in How to Download/Email Rates.
Step 2 – Share the campaign details or the downloaded file by writing to us at help@themediaant.com and our team will get in touch with you for further assistance.
Step 1 – Add the media options to your bag using the steps mentioned in How to Download/Email Rates.
Step 2 – Click on Pay.
Step 3 – A member from the client servicing team will get touch with you within 24 hours for further assistance.
A Tentative Log Report will be shared on a daily basis so you can hear their Ads live. Also, a Broadcast Certificate will be shared at the end of the campaign, channels provide a Broadcast Certificate with the exact timings of the Ads aired. The Broadcast Certificate is generated on the last date of every month.
A Tentative Log Report will be shared on a daily basis so you can hear their Ads live. Also, a Broadcast Certificate will be shared at the end of the campaign, radio stations provide a Broadcast Certificate with the exact timings of the Ads aired. The Broadcast Certificate is generated on the last date of every month.
A reporting sheet will be shared with you. The reporting sheet will include the deliverables of your ad. Click here to view a sample sheet. Most platforms will also provide you with a screenshot of the ad live on their platform.
A inspection pass would be shared post 2 days into the campaign. The pass can be used to visit the screen to physically verify the ads running. Also, an Exhibition Certificate would be shared once the campaign ends. This is a legal document to confirm the campaign execution.
Step 1: Log on to www.themediaant.com
Step 2: Click on the media vertical you want. (You can also select cross verticals)
Step 3: Select the media option you want
Step 5: Select the platforms you wish to target.
Step 6: Select the platforms you wish to target.
Step 7: Click on the Bag to see your saved media.
Step 8: Use advanced filters to customize. (Days, Ad Length, Targeting etc.) or you can also use the bulk edit option.
Step 9: Click on ‘Save to Dashboard’.
Step 10: The selected campaign will be saved to your dashboard.
Step 11: You can choose what you would like to do next with the saved campaign from the options provided.
Option 1:
You can send an email to help@themediaant.com with the requirement or alternatively, you can call us on 080-67415510 for telephonic assistance (Office timings: Monday – Friday 10.00 am – 6.00 pm)
Option 2:
You can also reach out to us for offline planning, there are two distinct options
- Excel plan – Rs 999 /- (Includes data up to 100 rows, turnaround time – 1 day)
2. 360-degree marketing plan – 9999 /- (Includes a PPT plan, with one revision allowed)
Step 1: Log on to www.themediaant.com
Step 2: Click on dashboard
Step 3: Select the campaign you wish to move forward with
Step 4: Click on the three dots and select pay and make the payment
Pre-Execution | ||
| Steps | Responsibility | Timeline |
Campaign Confirmation/Final Plan | Client | 4-5 days before live date |
| Sharing of Artwork | Client | 4-5 days before live date |
Company Documents – Link (GST, PAN, TAN, Company registration certificate & Invoicing name and address) | Client | 4-5 days before live date |
Payment Processing – 100% advance | Client | 3-4 days before live date |
| Lead Time | TMA | 1-2 working days |
Post Execution | ||
| Steps | Responsibility | Timeline |
Proof of Execution/Execution report | TMA | On the first day of the campaign |
Campaign Monitoring | TMA | During campaign dates |
Campaign Results | TMA | 1-2 working days |
How to get the best rates for buying Media Space: A step by step guide
Step 1: Log on to www.themediaant.com
Step 2: In the top right corner click Search. For example, if you want to search for rates for buying media space on Zee TV, type that in the search area (red circle).
Step 3: On the specific page of the selected media channel (For Example: Zee TV), click on select. Once the select button is clicked on, then it is added to your Bag
Step 4: Click on the Bag to see your saved media
Step 5: Use advanced filters to customize. (Days, Ad Length, Targeting etc.)
When in Doubt or have any questions ?? Get in touch with us by clicking here
If you would like to get the most bang for your buck, through our customized services, select one of our special requirement plans by clicking here
Step 1 – Click on “Become Agency Partner” under the about us section. The about us section can be found by scrolling down to the bottom of your screen.

Step 2 – Click on the “Joint Now Button”.

Step 3 – Fill in the required details. Our concerned team will connect with you within 24-48 hours to complete the registration process.

Option 1:
You can send an email to help@themediaant.com with the requirement or alternatively, you can call us on 080-67415510 for telephonic assistance (Office timings: Monday – Friday 10.00 am – 6.00 pm)

Option 2:
You can also reach out to us for offline planning, there are two distinct options
- Excel plan – Rs 999 /- (Includes data up to 100 rows, turnaround time – 1 day)

B) 360-degree marketing plan – 9999 /- (Includes a PPT plan, with one revision allowed)


Steps
- Open the Media Page and click Select. The Media option gets added to the Bag

- Click on the Bag

- Make any changes required and then Save to Dashboard

- Go to your Dashboard by clicking on the Profile Icon

- You will see your campaign there. Click on the 3 dots on the right-hand side
- Click Download/Email


